This past month,
I was able to work on two of the most
incredible chairs.......
Here's the first one:
This is an antique "Northwind" chair.
I believe it was a Sears and Roebuck chair
that mimicked those very popular ones
from the Victorian era...
I truly HATE stripping,
but I just had to see
what was under that brown paint and stain...

Tiger oak!
So at first,
I thought it was just the arms and back...
And here's the next one!
I was able to work on two of the most
incredible chairs.......
Here's the first one:
This is an antique "Northwind" chair.
I believe it was a Sears and Roebuck chair
that mimicked those very popular ones
from the Victorian era...
I truly HATE stripping,
but I just had to see
what was under that brown paint and stain...

Tiger oak!
So at first,
I thought it was just the arms and back...
But take a look.
Now I'm not sure if it's all tiger oak..
maybe some graining tools were used?
I don't know, but whatever it is,
IT'S GORGEOUS!!
I was delighted when a friend from junior high days
purchased it!
(Thanks, Melanie Bentley!!!
And it gave me the opportunity to see you after
a few years.......so fun to reconnect!!!)
This awesome chair was purchased
at Greenwood Antiques and Uniques.
at Greenwood Antiques and Uniques.
Yes, it needs some work, but....
Check out the arms!!!!!!!!!!!!
Rams' heads........
Although they look like wood,
I believe they are some kind of resin..
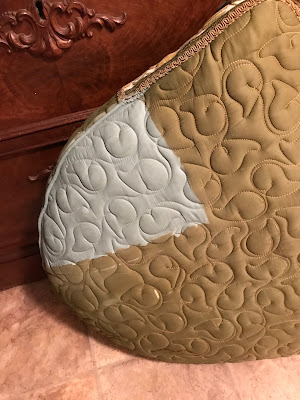
The chair was covered in an olive green quilted sateen fabric..
Very dated because of the color...
But except for the arms and apron,
the fabric was in great shape.
Because of this,
I did an experiment to see if the fabric could be painted.
Because of this,
I did an experiment to see if the fabric could be painted.
Indeed!
So the makeover begins...
I removed all the armrest fabric and batting..
It's now stripped to the muslin covered horsehair/straw.
Bye bye brown and green...
I painted the trim with white chalk paint,
using a drybrush effect...
So that the paint doesn't get in the crevices.
This pops all that luscious detail!
After all the trim was painted,
I begin painting the fabric.
You want to wet the fabric,
and then use lots of water with the paint,
and thin multiple coats..
So, in a way, you are "dying" the fabric"
vs."painting."
You don't want the paint to simply sit on top.
You want the fabric to absorb the paint.
After each coat was dry,
I lightly sanded.
This softens the fabric and makes if feel smooth.
Here it is after 3-4 coats.
I'm so glad I was able to save this fabric!
I love the texture of the quilted swirls.
And painting vs. reupholstering the whole piece
saved hundreds of dollars.
Everything was waxed,
and then I upholstered
just the apron, cushion,
and armrests with
this gorgeous animal print chenille....
that was purchased from Ufab.
The painted fabric has a slight sheen from the buffing
that helps marry it to the sheen of the fabric.
And because you are sitting and resting your arms on the
fabric recovered portions, it doesn't affect comfort.
Here's a closeup of the arm after waxing and buffing.
And here it is delivered to its new home..
It is gorgeous!
I think Kay was very happy with her rehabbed chair!
AND
I was happy to make a new friend!
I was happy to make a new friend!
(PS: She's an awesome estate attorney
that I would highly recommend!
Contact me for details.)
Contact me for details.)
A regular chair is going to seem
so pedestrian after these two!
so pedestrian after these two!
Wow!
I'll have to really pump up the fun factor!
Need a chair makeover
Oh, yes,
I can help!
SheShe, The Home Magician
Sheila Fox
sheilafox@aol.com
804-402-4370


No comments:
Post a Comment