Tuesday, April 29, 2014

One Footstool, Two Footstools, Three Footstools, Four!

What does one do on a dreary, rainy Tuesday?
Get off the sofa and find something inside to do!
I was going nuts here twiddling my thumbs.
So I pulled out a bunch of fabric remnants, trim,
and these four thrift footstools and began some magic:
A friend found this on the side of the road…
It was dark wood and had a hand painted duck scene on top.
(Thanks, Terese!) 
I promptly painted it with white chalk paint.
I added batting and then used this ikat remnant to cover the top.
Then I tried several trim options along the edge...
I ended up choosing this plain red piping that I glued along the bottom edge.
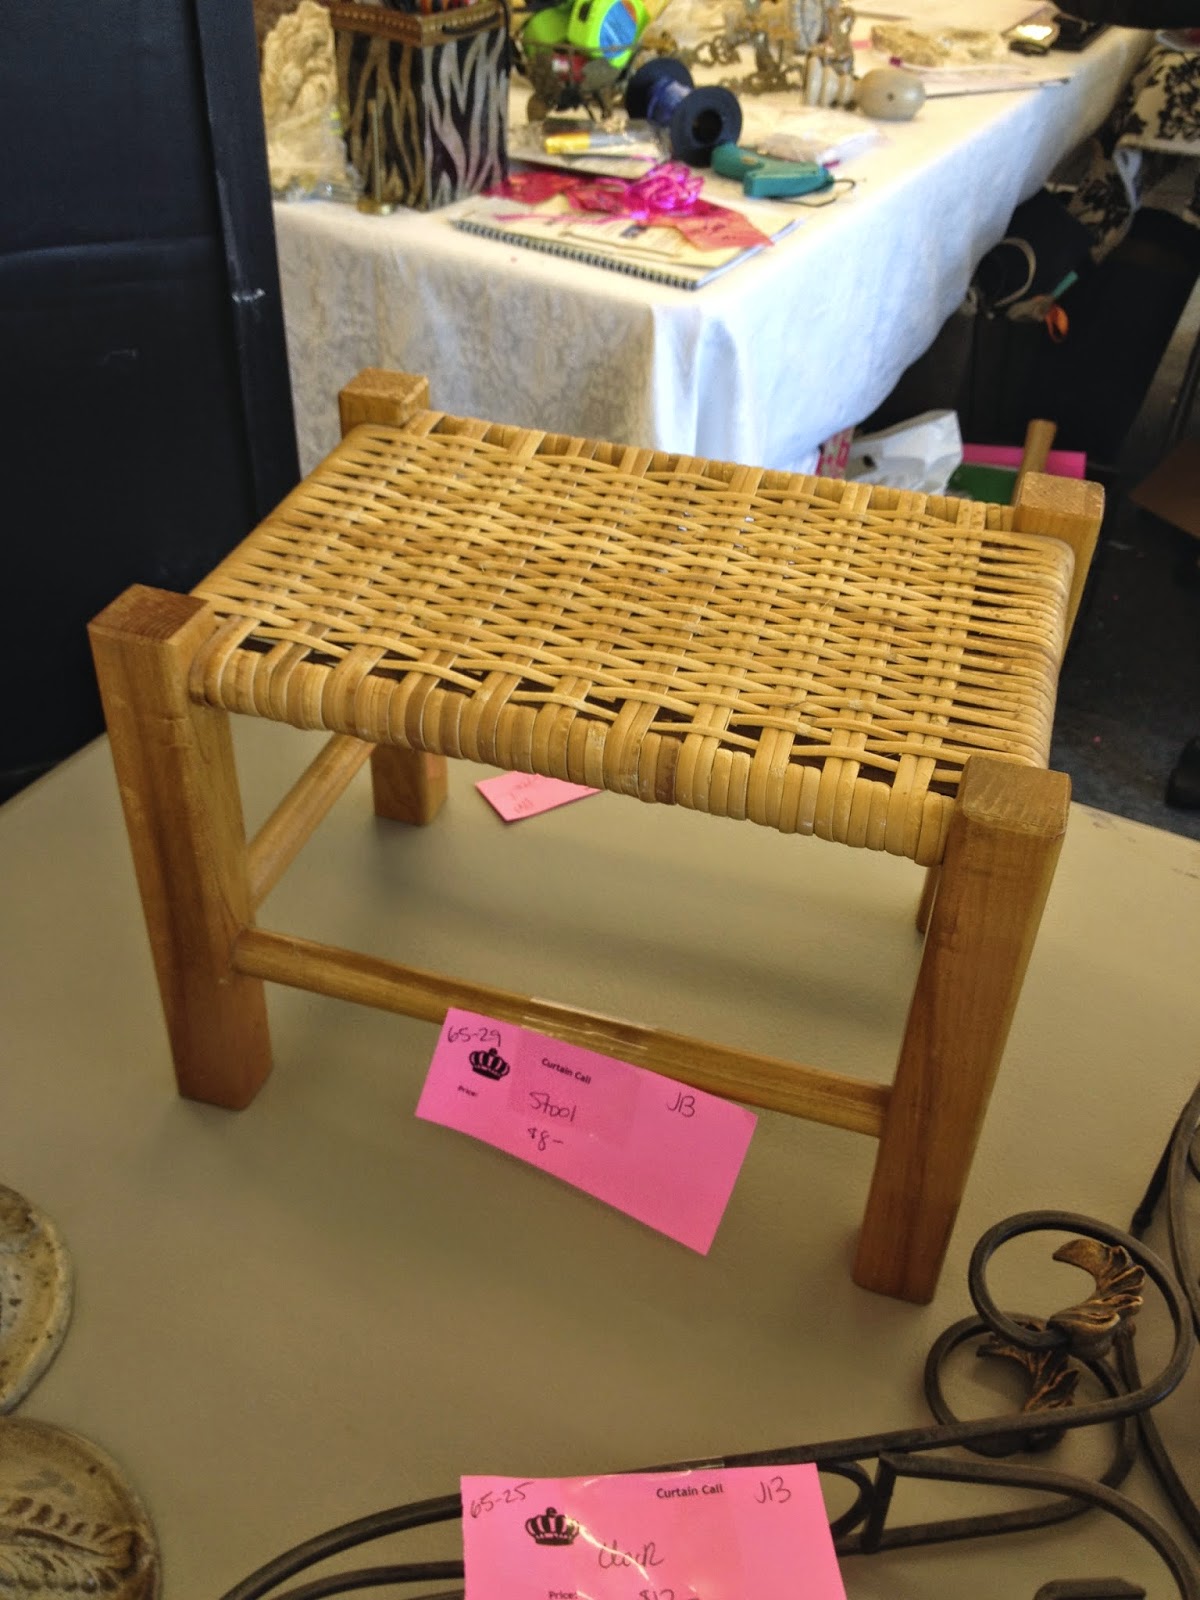
 This little cane top stool I purchased at Curtain Call this year.
I painted it in a homemade chalk paint I whipped up
with warm water, plaster of paris, and a $3 sample from Valspar.
After the paint was dry, i cut batting to fit the top.
Then upholstered with this fun zigzag remnant. 
I glued red pompom fringe to the bottom edges.
 Another thrift store find…
this one tufted in a butterscotch velvet.
I painted the legs in the same homemade chalk paint.
I filled in all the indentations with polyfill,
then covered the top in batting and stapled down all the edges.
Next I used a remnant in this botanical linen print to upholster the top.
Next, I added this beautiful trim with pompoms around the bottom edge.
Here's the overhead view.
And finally, this little wooden stool from Goodwill.
I painted the base in a pale green, gave it a stain overlay,
and added a padded top in another botanical remnant.
I added a few brass nail heads around the wooden base.
 
And  here they are:
My rainy day assembly line.
All one of a kind…
Which is your favorite?
 Uno..
 Dos
 Tres
Quatro
$42 each….
Oh, and while I'm counting,
let me say
Happy 2nd birthday to Wilma Pea Pie!
(Here she is outside the tub waiting for her pray:  Me…)

Wednesday, April 23, 2014

Chair Rehabs: Custom Upholstery and Paint Jobs

Hoping everyone had a lovely Easter…
I did lots of work over the long weekend on my mom's carport...

Here are a couple of chair rehabs I did for clients:
 Here's a chair one client had attempted to redo, 
but, well, it just wasn't working...
( Here's inspector Wilma giving it the once over...
 Yep, everything is in order and ready for a makeover..
Wilma Approved!)
The chair still had part of its original
colonial styled upholstered skirt…
and a couple of homemade cushion covers.
I starting by removing all the fabric………
and a zillion staples…
(Sometimes the deconstruct takes as long as the rehab!)
 …sanded down the unfinished edges……...
…glued back some popping veneer..
 I painted the chair in two coats of ASCP in Paris Grey.
 Then I distress sanded and waxed everything.
I rebuilt the seat with new batting…...
 And upholstered the seat with this tobacco/indigo striped linen.
I used gimp to cover the staples, 
and added a few oversized pewter nail heads
for a little glam….
For the back cushion, I used some old printed burlap for the front,
…and the same striped fabric for the back.
The back cushion can be flipped…
Two looks in one!
 Another client delivered this family heirloom, 
a caned rocker in disrepair.
She had seen some headboards in my booth that
I had upholstered in this botanical fabric.
I had just enough left to use for the chair.
 I removed all the damaged caning from the back. 
I painted the chair frame in two coats of ASCP in French Linen.
 I lined the back with burlap.
I flipped the chair over, adding a layer of batting, 
and another burlap liner to the front.
Then I planned out the lay of the fabric, 
folded over the edges and stapled.
 I used gimp to cover all the edges.
 Oh, I forgot to show you the distressing/waxing part…….
See how the detail pops in the chair top?
After using clear wax, 
I added some dark in the details and to the edges.
Then buffed everything to a sheen.
Then I upholstered the back in the same way.
Stapled…then glued gimp along the edges.
 Back view.
 And finally, 
I added foam and batting over the existing cane seat,
 and then upholstered the seat.
The finished rocker. 
Such an improvement.
My favorite part of this chair…
the bugs!!!!
(Better not let Wilma see this one...
She loves a bug!)

Wednesday, April 16, 2014

In the Mood for Some Blues

Okay, yesterday I was "in the pink."
Today I'm back to my normal color palette: Blues!

Trying to finish up some last minute pieces 
before I pack up the car and head to the booth.

Here's today's work:
 Although it may look like an old brass/bronze framed mirror,
 It's actually weathered plastic…….
it's been up on my rooftop deck for ages.
 I first painted it in ASCP Old white…
then added splotches of pale blue, 
 ….and just a hit of turquoise here and there…
to simulate age...
 And then I applied clear and dark waxes.
 It looks like it's been weathered for years,
 and I much prefer the shabby finish vs. the "old world."
 I purchased this little cellarette from an antique store.
I loved the detail on the front door, and the turned legs, but the finish is boring.
 Now it looks like a true antique
with lots of paint layers and washes.
 I experimented on the top with creating a faux woodgrain...
 I used graining tools after painting on a wash of ASCP in Graphite over the existing finish.
 I dry brushed layers of Aubusson Blue, Paris Grey, Graphite...
 ..and used lots of dark wax in all the crevices and edges.
I'm thinking this might need a tad more dark blue.
so i'll look at it again when it comes out of the car tomorrow..
 …a little thrift store wooden frame gets a deep blue distressed finish.
I have surely been into these layered finishes of late…
When I return from the Easter holiday, 
perhaps I'll stretch my wings and try something totally different...
 I also was able to finish these upholstered seats for my client's porch.
 I painted all her outdoor furniture awhile back, and found this great
rug.
 This fabric goes perfectly.
I love the tomato red edging.
Welcome to the islands!
For now, this little fox is tuckered out!