My client, Laurie,
downsized to a condo last year.
She asked me to come over
and take a look at her master bedroom.
She was interested in sprucing it up...
Painting the walls and the furniture...
She has two double windows in the room.
An armoire, chest of drawers...
and this cedar chest at the foot of the bed...
All the furniture was mismatched...
When I returned recently to finalize plans,
Laurie had found this great, cheery bedding.
I love the colors...
But rather than painting the room,
I suggested just painting the furniture and
dressing the room with drapes, art, etc.
To refresh,
there's this chest of drawers with brass hardware..
This large armoire...
Laurie also has this nightstand she wants to bring in
and use in the master.
So yesterday was a work day.........
Wanna see what was done in just ONE DAY???
Whenever I have multiple pieces
to do in a small amount of time,
it's very important to do them in an order,
to allow for dry time, etc.,
and to be efficient with your time.
I started the process by removing
all the hardware on the furniture.
I took out all the drawers
and then I wiped down all the furniture.
Next, I mixed up some chalk paint to match the bedding.
I'm using Annie Sloan Chalk in Pure White,
Country Grey, and Maison Blanche in Peacock.
And the painting begins....
I'm using this color for the armoire and nightstand.
And the armoire also gets Pure White...
With a wet rag,
I start "wet sanding" the edges on the armoire,
to give it that distressed look
and pull out some of the wood tones.
It also cuts down on the dust!!!!
Dry sanding would be terribly messy!
I also did the same with the nightstand...
after drybrushing a little of the Pure White over it.
Now these pieces are drying before I can add wax.
On to the chest of drawers.
I'm painting this in Annie Sloan in French Linen.
I paint all of the ugly brass hardware.
I used a mixture of the paints I've used in the furniture,
but I'm not liking it...
it looks too forced...
So I spray painted a couple of different colors.
I'm going with the Oil Rubbed Bronze.
Here's my spray painting station in the garage...
And while I'm at it,
I'm taking this thrift storage piece...
And spray painting it turquoise........
Great bedside storage.
Now while everything is drying,
I'm going to concentrate on decorating.
I removed the top of the cedar chest,
covered in this aqua linen,
and reattached.
Perfect and fresh!!!
(And no more country hearts!!)
I found two drapery options that I like...
This sheer aqua...
..and this taupe and white.
I decided to go with the aqua.
It's light and fresh...
I hung them with simple bamboo poles and some curtain rings,
which I nailed to the top of the moulding.
Next, artwork for above the bed.
I found this one,
which Laurie likes a lot...
And this one,
which I LOVE.
It is so textural and I like the yellows in the art.
Option A
Option B.
(Sometimes it's good to have a couple of options,
because until you have all the pieces together,
it's hard to judge what works best.)
Now it's time for finishing the furniture.
Everything has dried sufficiently.
The waxing process is by far the hardest.
It's physically challenging...
but makes all the difference!!!!!!!!
Check out the pieces after buffing
and adding back the hardware.
Scrumptious patina!
And here's the finished chest of drawers.
For this one, I chose to keep the finish
"clean" with no distressing.
And now,
it's time to put the room together!
Guess which art piece won!!!!!!!!
On one side of the bed, the nightstand.
On the other,
the storage piece.
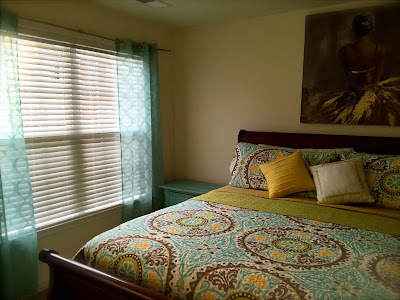
The drapes make so much difference.
They give the room an ethereal feel.
All the tones in the room work together now.
Beautiful!
Rest well, Laurie.
I know I will.
It was a B I G day!!!!!!!!
And THANK YOU for the awesome project!
Have a space that needs some punch?
I can help!
SheShe, The Home Magician
Sheila Fox
sheilafox@aol.com
804-402-4370


