Tuesday, November 24, 2015

How to Simulate A Reclaimed Wood/Industrial Style Platform Bed

The industrial bedroom project is done!!!! Yay!
And I must say, it is gorgeous and one of my favorite makeovers to date.
BUT
Too many photos to go through before I head out of town for Thanksgiving.
So, for now, I'll show you how I made an industrial platform bed...
out of this ugly waterbed base I found on Craigslist.
I had to retrofit it for a queen size bed.
 I purchased plywood, 
which I cut and screwed to the bottom of the pieces,
and then also cut and screwed on top.
Then I painted the edge so it would blend in.
But those honey oak drawers are still pretty bad…
 So I started layering paints over each of the drawer fronts.
 I used chalk paints so I didn't have to prime.
 Annie Sloan is still my favorite brand……
I used Country Grey, French Linen,
then I mixed Graphite and Barcelona Orange 
to make a chocolate brown…
I didn't want total coverage…
wanted some of the wood to show through.
After the paint, I added dark wax and stains.
 I purchased these cup pulls from Hobby Lobby.
 I used dark wax on them as well.
 Next, I purchased a bunch of yard sticks from Lowes...
 I didn't like all the print, 
so I just painted over the logos and such...
 Lots of stains and waxes later, 
and they look like they've been in an old garage for years.
Perfect!
 I used Power Grab adhesive on the back,
 And then nailed them all along the base of the bed, 
to hide the edge of plywood.
Wow….a vast improvement…...
 Very tasty………looks like reclaimed wood.

More to come after Turkey Day!

Hope all of you have a blessed Thanksgiving!

SheShe, The Home Magician 
Sheila Fox
sheilafox@aol.com
804-402-4370


Sunday, November 22, 2015

A revamped retro child's set - saved from a landfill!

Even when I'm out of town,
my "pickers" are keeping an eye out for me.
(Thank you, Molly B., for picking up all this loot for me last week!)

I got to cranking on the little table and chair set today.
 They were pretty disgusting, but nothing I couldn't fix.
 The edging on the little retro style table had some apart, 
so I glued and clamped that
after giving it a good cleaning.
 And I got to try this technique I recently read about: 
How to revive damaged chrome.
 The trick?
Wet some aluminum foil, 
crumble it up, 
and go to town on the chrome.
 I wasn't sure if this really was going to work, 
but take a look!!!!!!!
 It did a beautiful job of restoring the chrome to like new condition!
Next, I removed the seats, cut some batting for a little extra cushion...
 And recovered in this cotton duck.
Seriously, this little set looks brand new.
And we saved it from a landfill!!!!!!!!

 Good for us!!!!!!!!!
 And while I was working with the fabric,
I had an idea of how to fun up this little wall piece.
First I removed the little metal scrolled pieces..
 I painted in a distressed aqua finish.
And I cut out medallions from the fabric and glued on the inside.
Cute Cute.
Little cabinet/key rack: $30
Retro style child's table and 2 chair set: $75

Great little presents for under the tree!
They'll be heading to my booth at Greenwood,
unless you catch me first!

SheShe, The Home Magician
Sheila Fox
sheilafox@ aol.com
804-402-4370

Thursday, November 19, 2015

Industrial Urban Bedroom: A Teaser! Faux Painted Brick

HELLO!!!!!!!
Do y'all remember me?
I've been a bit out of circulation!!!!!
A whirlwind road trip to Illinois for a family funeral.
An open house at Greenwood Antiques this past Saturday.
And now, at last, I am finally able to sink my teeth into my latest project:
An industrial urban basement bedroom for my client, Nancy.

I've made lots of progress the last couple of days 
and I'm close to completion,
but not ready to show you the makeover quite yet.

However, I will show you one little teaser.
And it's a good one!
On one wall in the basement, there are three
brick inserts which are painted white.
They run the length of the basement...
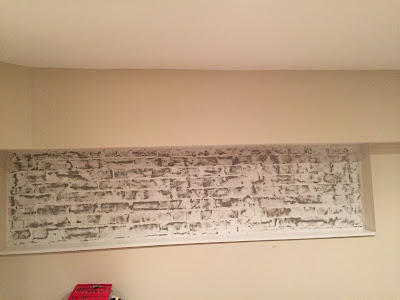
 So today, I decided I had to do something about this white brick...
 I just started rolling on some paint. 
First I used BM Galveston Grey.
 And I just started adding colors….
Next was Annie Sloan French Linen.
 Then I mixed up some Annie Sloan Barcelona Orange with Graphite……..
and then just Graphite…..
 See how it's finally starting to look lie old brick?
 I continued adding colors……
some khaki…...
 I added a wash of the grey…..
 Then I decided to paint the trim around the inserts in the Galveston Grey.
 Finally I added some stain; 
Brushed on, wiped off.
Here it is all propped with Nancy's accessories.
Looks totally authentic!!!
I LOVE IT!!!!!
 But I have two more to go!
 Same technique…...

Looks amazing!!!!!

And definitely adds to the industrial feel of this basement space.

I can't wait to finish it up!!!!
You'll be the first to see.

Have a room that needs some zing?
I'm your gal!
SheShe, The Home Magician
Sheila Fox
sheilafox@aol.com
804-402-4370

Tuesday, November 3, 2015

Despa's Kitchen is Finished: Yes, you CAN paint Laminate Cabinets!!!!!!

I recently was commissioned to give this kitchen an update.
Check it out.
 
Here's Despa's kitchen.
The laminate white cabinets have yellowed,
and some are peeling…
And the hardware is dated.
Despa wants a spruce up!
The countertops are a faux granite laminate,
and the backsplash and floors are black and white.
The walls are a yellow green.
Over to the left, 
Despa has an open shelving unit
that houses all her cookbooks.
On top, she has a TV and cable box.
I would suggest perhaps a hutch or cabinet here
that we can use to hide all the clutter and provide
more storage.
 On the other side of the room 
is this fun little built-in shelf that used to be
an ironing board cabinet.
 Can you tell Despa's favorite doggy breed???
Yep, Scotties.
She has two:
Boots and Minnie.
And lots of scotties in her decorative collections.
 She has a table and chair set from the 70's…….
The chair cushions are worn and need a makeover.
And over here at the door to the dining room,
is another open shelving unit.
I have lots of ideas…….
So here's what I recommended:
I suggested painting the cabinets in two tones
White above and a blue grey below.
Despa thought about a khaki for the wall color,
and I loved that idea.
 
Always always do test swatches………
I chose several different blue grays for the base cabinets and the doors.
 And i chose several wall colors as well.
I taped letters at each sample,
..and made a "key."
My recommendations were
Crisp Khaki for the wall color,
White Dove for the upper cabinets,
and Puritan Gray for the base cabinets.
All Benjamin Moore.
I also recommend painting both doors in the kitchen
a slightly lighter blue-gray, Boothbay Gray.
And the work begins!!
I started by painting all the trim in White Dove.
Next, I painted the walls.
Then I removed all the cabinet doors and 
moved them to a garage where I'll work on them.
I primed and painted the doors and the cabinet frames.
This is what I like to use for cabinets:
This bonding primer STIX is the bomb!!!!
Followed by Advance.
And here's a little tip:
When doing colors,
ALWAYS use a tinted primer…
For the doors that had peeling laminate,
I decided to remove all the vinyl.
The first one I did by scraping...
But then I decided to try a heat gun. It worked great,
melting and lifting up the vinyl.
Then you are left with the MDF doors…
Unfortunately, the adhesive didn't come up easily.
That involved hours of scraping with razor blades,
but finally, I got them smooth.
And before painting over raw MDF,
because the latex will make the particle board swell,
I like to always prime first with a shellac based primer.
I decided to paint the back of the little built-in
in Boothbay Gray as well.

Oh yes, it's coming together.
Doors are painted, walls and trim are done.
The Boothbay Gray looks great with the Crisp Khaki.
I hung this antique dough bowl on the pantry door.
And hung a few things on the wall...
 
And I purchased this hutch 
that I think will work great for storage.
It's a little Colonial looking, 
but I'll change out the hardware to update it.
All the cabinetry got a prime coat, 
and three coats of paint.
I lightly sanded between coats.
I had these dry overnight in the garage before rehanging.
It takes 30 days for latex to fully cure,
so it's important to treat them very delicately.
I put new satin nickel bar pulls on all the doors 
and drawer fronts.
They really modernize the look of the cabinets!
The base cabinets doors are back on.
I used a semi-gloss finish for the cabinetry
and satin for the walls.
Next I removed the open shelving unit
and replaced it with the hutch.
It really cleans up the look 
and brightens the room!
I repainted it in the cabinet colors, 
and changed out the hardware to match.
And the kitchen is finished...
Clean
Contemporary

Modern.
Streamlined.
It looks like a brand new kitchen!!!
A lot of work,
but well worth it.
It looks amazing, Despa.
Thank you!!

(I'm still working on upholstering the four chairs,
but I couldn't wait to show you this awesome 
kitchen makeover!!)


Have a kitchen that needs a lift?
I can do it!
She She, The Home Magician
Sheila Fox
sheilafox@aol.com
804-257-5515