Tuesday, June 28, 2011

Get Scrap Happy!!!!! Using Fabric Scraps for Reupholstery


Yikes, it's been a while since my last blog post.  What can I say, a girl's gotta work when she can;)  I've been busy with many projects, and lots of sewing projects lately......and I wanted to share with you some of my creations that I've pieced together from cast off chairs and lots of fabric scraps.......


So usually when I complete a sewing project, I have a big box of scraps left....like this........too little for anything substantial but way too wonderful to throw away...........


Here's a chair I picked up at a yard sale. Cute lines....
 Great wood details  but the pink velour tufted upholstery is tired and dirty.
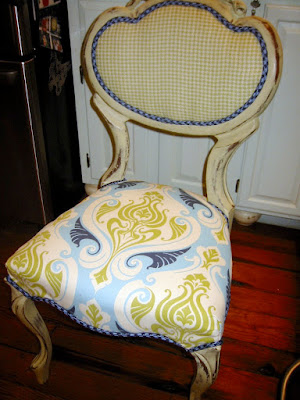
 Here's what it looks like after a new paint job and my fabric scraps.......
 I used my favorite furniture paint, Annie Sloan's Chalk Paint, in Versailles, and distressed and waxed.  Look how beautiful the detailing is now.........
 I used four different fabrics.  Love how this turned out! This is for sale at Greenwood Antiques.
 Next up, this chair I literally found in the alley in the trash.  It had a big hole in the caning, but again, it was sturdy and too good to throw away.  So I brought it home.....
 Here's what it looks like after it's rehab!!!!!!!! Fresh and one of a kind for sure!
 One of the fabrics I had used recently for a project had a wonderful medallion pattern, so i simply made padded pieces and attached them to the front and back to stabilize and hide the hole. Then I painted the cane in Old White.....
 And used different colors to accentuate the details in the wood frame. I pieced together a paisley print for the seat and used a green houndstooth for the piping........
 And finally, here's a chair that a friend gave me..........in need of a little rehab for sure......
 Nice carving in the wood, but icky finish and dated tapesty fabric...and in need of a little leg repair.
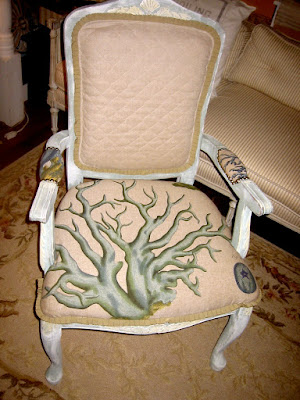
 And here it is after a couple of weeks hanging around me! I painted the frame of course, in my typical distressed finish, reattached the leg, and then used an assortment of linens to reupholster.....
 For the seat and arms I used some pieces of this wonderful coral/sealife patterned linen I picked up at Williams & Sherrill.
I covered the back in a pleated oatmeal linen, edged in gimp.
 I used a ruffled edging around the chair front/seat, and bronze nailhead trim around the armpads.
 Finally I made a pillow out of more remants.  Can't you just see this in a beach or river home??? For sale at Cabell House.  Kitty NFS.  Go out there and get scraphappy, folks!

Thursday, June 9, 2011

Trompe l'oeil on a Thursday - Bifold Door Makeover


 I know you've probably lived in at least one apartment or house in your lifetime that had these... Lovely, non-descript boring bi-fold doors...........
'
Yes indeedy, completely void of any detail or architectural interest of any kind. Oh wait, I'm sorry, there are....the knobs........
 
But you CAN improve these I promise..........So gather up some tape, lots of painter's tape, and paint and brushes, and let's get to work.


What we're going to do is fake the eye into thinking the doors have dimension by taping off sections and using different paint tones.  Here's how to do it:  Base coat the doors and let them dry a couple of days if possible.  Next, for each "panel," apply two rectangles of tape.  Apply tape following the outside perimeter of the door, about 1-2 inches in. Then leave an inch or so, and apply a smaller rectangle of tape inside the first. It's all in the prep. Next, mix up some white with your original paint color and paint inside the smallest rectangle.

Next you're going to paint the strip between the two rectangles of tape.  In my case, there was a window in the room to the left of the doors, which would be my lightsource, so i'm going to mimic that light.  I painted the "L" on the left hand side in white.....

Then, on the right hand side, paint the inverted "L" a darker color.  You can mix some black or brown with your original paint color, or you can just pick a darker shade of a similar color.

Peel off the tape.  And here's what you're going to get. Amazing.........with a little optical trickery, you can give the illusion of dimension in the doors!  (If it's your first time, you might want to mimic just one panel.  For these, I did upper and lower ones.  It's a lot of taping, but the effect is well worth it!)
Next, I applied a white glaze to "knock down" the color a bit and age the finish.
 

I added satin nickel chunky knobs, and here's the final product.  Tuscany right there in your bedroom!....What an improvement!  Thanks for reading!!!!!!!!

Wednesday, June 8, 2011

The Art of Disguise: A Fireplace Makeover

Today I thought I'd share this little mini-makeover. It's a perfect example of how to "think outside the box."

BEFORE: This is Whitney's house and she has hired SheShe to do a little home magic.....Since it's a rental, she can't paint this ugly brick fireplace and hearth.  What an eyesore.  The mantle is flanked by wonderful built in book cases with beadboard backs. Be still my heart!

 So take a look at what I came up with.
 AFTER:  Abracadabra!!!!!!!!! No more ugly brick...........

Here's what I did:


I purchased some medium weight fabric, hemmed the sides and hung it just below the molding with a tension curtain rod.. The fabric is a beautiful silver blue that complements the backs of the builtins....And the little brown flower line drawings help marry the dark wood of the fireplace.


Next, I took a piece of plywood, and added some molding around three sides so that it will slide right over the existing hearth.  (This was an option because this is not a fireburning fireplace but an electric one....) I primed and painted the wood in a two toned yellow and aqua harlequin pattern, added brown fleur de lis motifs, and added a stain for an aged effect...


Take a look! Here it is "installed." Pretty clever if I say so myself.


When Whitney moves, she simply takes down the fabric and lifts off the plywood to reveal that lovely brick. 


But for now, it's a huge improvement, don't you think?  Thanks for reading my blog! And happy decorating!

Thursday, June 2, 2011

Great Gift Idea - Collage Photo Transfer Pillows

Don't throw those fabric scraps away!!!!!!!! I want to show you what can be done with a few snippets and pieces of fabric and trim.....and some family photos.

Use them to make a collage photo transfer pillow! They make great gifts.

Here are some I've made in the past.

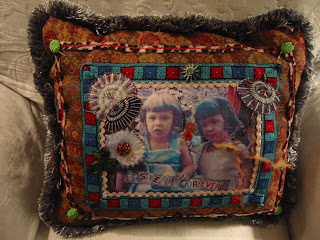
This one I gave to my sister for Christmas one year.
 (She's on the right; i'm on the left...aren't we C U T E??)  


Here is my very own technique.
1) Find a photo that you want to use.  Blow it up on your computer/scanner, and print it out on photo paper.
2) Next, cut around the images of the key people or items from the photo...


3) Now, take your cutout and create a tabletop montage of items, backgrounds, etc....you can add lace, flowers, art, anything you want!  You can even take photos of people from different eras and create a collage using them together...........when they may have never been together in real life.......Wow....I'm powerful.  This is 
fun....Manipulating reality. Yeah!!!!!!!!

(For this one,  I actually cut out letters from a magazine, and made a little banner, "sisters forever" then cut around my hand in the photo and slipped the banner beneath it, like I'm holding a sign. Neat, huh?)

4)After you have your montage to your liking, use a digital camera to take photos of the tabletop display.  I like to change things around, cuz you never know what it's going to look like really until you upload the photos...Once you have the photo you like....the real fun begins!!!
5) Manipulate your image, adjust color, crop, etc., and then print it out on photo transfer paper.
6) Following the directions, iron on the image to muslin or other light colored fabric.......Make sure you iron it enough to have the image transfer....peel the backing off.  Then take this piece of fabric, and just start designing your pillow front.........I use beads, charms, pompom fringe, rickrack - whatever you want.  It's also fun to stitch around the figures and then "stuff them" by adding polyfill between the fabric layers.

Here's one I made for a friend who lost her dear pet to cancer.  "Detail earns his wings."


This commissioned pillow features two sisters with their actual mom as a child as well....Here's a pillow I made for a friend's daughter. She found it on Christmas morning in this Princess Chair I made from scratch.  "The Princess is In."


So start snipping.  And have fun!